
Whether you’re changing the URL of a single page or migrating to a completely new domain, learning the ins and outs of the 301 redirect WordPress rules can help improve your site’s user experience and safeguard your site’s SEO health.
Here, we have distilled the process of 301 redirects in WordPress into an easy-to-follow tutorial.
You can implement this nifty maintenance feature at the page or domain level in just a few minutes.
What is a 301 redirect in WordPress?
A 301 redirect, or permanent redirect, is an HTTP status code for permanently moving a web page to a different URL. If someone types the old URL into their browser or clicks on a link that points to the old URL, your site will seamlessly take them to the new URL that you specify.
Furthermore, a 301 redirect tells Google that the page has permanently moved and that Google should treat the new URL the same as they did the old URL.
It’s important to understand 301 redirects because they help you:
- Pass on link equity if you change a URL’s page or remove/combine an existing page as part of a content audit.
- Take users to a functional page instead of displaying a 404 error.
- Change your WordPress site’s domain without losing all your hard-won SEO rankings.
- Tell the Google crawler a page has been permanently moved.
301 redirects vs 302 redirects
Although five different types of redirects exist—301, 302, 303, 307, and 308—301 and 302 are the most commonly used.
- 301– A 301 redirect in WordPress is a permanent redirect. It permanently points both Google bots and a site’s visitors to the new page.
- 302– A 302 redirect is a temporary redirect. It does not redirect Google bots and thus does not pass on link equity. It only redirects the URL’s human visitors to the new page.
Because of the way Google’s crawlers “read” these types of redirects, 301 is the preferred method of re-routing traffic to a new URL if you’re making a permanent switch because it preserves as much of your SEO efforts as possible.
A 302 redirect is helpful if you need to temporarily funnel traffic to a different page during times of maintenance or construction—but it should be used sparingly, and with the understanding that it won’t transfer SEO benefits
How to set up a 301 redirect in WordPress
As with most tasks in WordPress, there are many ways of setting up a 301 redirect. You can use a 301 redirect WordPress plugin, your site’s .htaccess file, Yoast SEO, and even straight PHP. The .htaccess file and redirection plugins are, however, some of the most accessible options.
Method one: Use the Redirection WordPress plugin for page-level 301 redirects
The free Redirection WordPress plugin is great for setting a 301 redirect in WordPress on the page level. That is, redirecting yoursite.com/old-page to yoursite.com/new-page.
To get started, install and activate the plugin from WordPress.org. Then, go to Tools -> Redirection to run the plugin’s setup wizard.
Once you go through the short setup wizard, click the Add New button in the Redirects tab to create your first redirect.
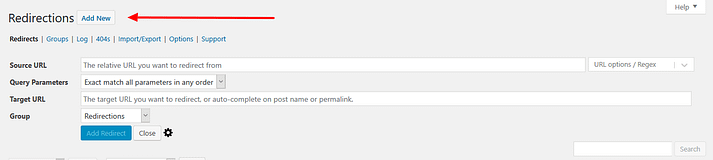
You’ll see four settings – here’s how to configure them:
- Source URL – enter the original URL that you want to redirect. I.e. when someone visits this page, they’ll be redirected to a different page.
- Query Parameters – leave this as the default.
- Target URL – this is the new URL that you want to take visitors to. I.e. if someone visits the source URL, they’ll be taken to this URL.
- Group – this just helps you organize your redirects. It’s fine to leave it as the default. Or, you can use the Groups tab to create a new group if you want to organize your different redirects.

Then, click Add Redirect to complete the setup.
If your page doesn’t seem to redirect at this point, clear your cached data and the redirect should start showing up.
Method two: Use .htaccess to add 301 redirect in WordPress
If you’re migrating a domain, using your WordPress site’s .htaccess file to set up the 301 redirect is the most efficient option. You can also use your .htaccess file to set up page-level redirects, though it’s not as convenient as the plugin method.
To get started, you’ll need to connect to your site’s server to edit your .htaccess file. You have two options:
- Connect to your server via FTP.
- Use cPanel’s built-in File Manager tool, which is what we’re using below.
1. Locate your .htaccess file
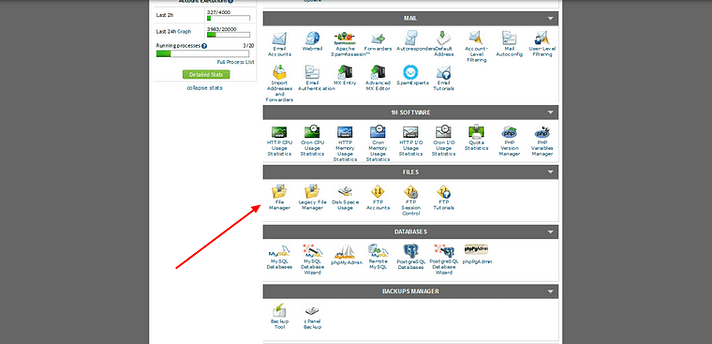
To modify the code in your site’s .htaccess file, first log in to your server’s cPanel dashboard and look for the File Manager tool:
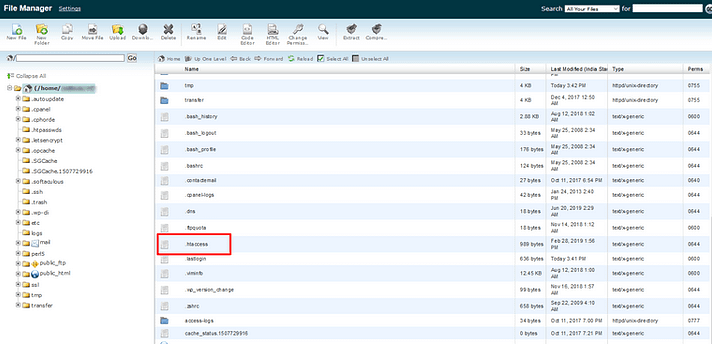
Then, you can find the .htaccess file in the root folder of your site. You can also search for it by name:
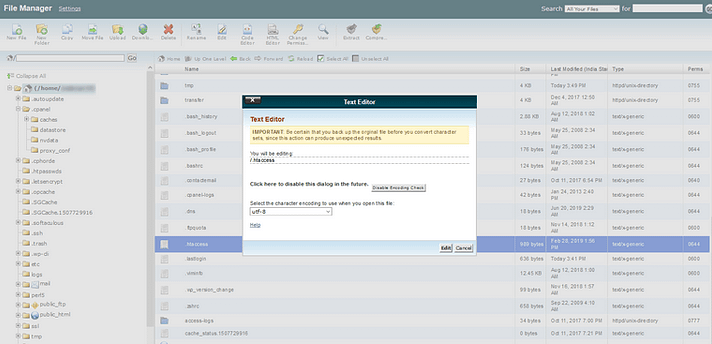
2. Back up your .htaccess content
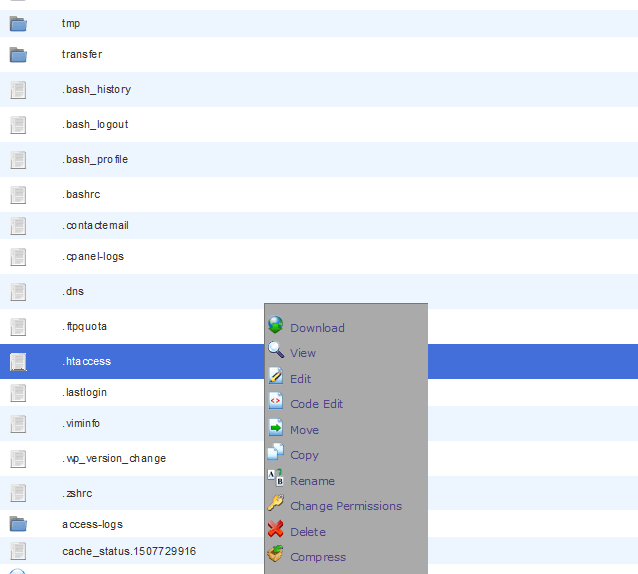
This next step is crucial. The .htaccess document could affect the functionality of your website if not handled correctly. Before making any changes to this file, make sure you have backed up the original by right-clicking the file name and selecting “Download”.
3. Add the 301 redirection code
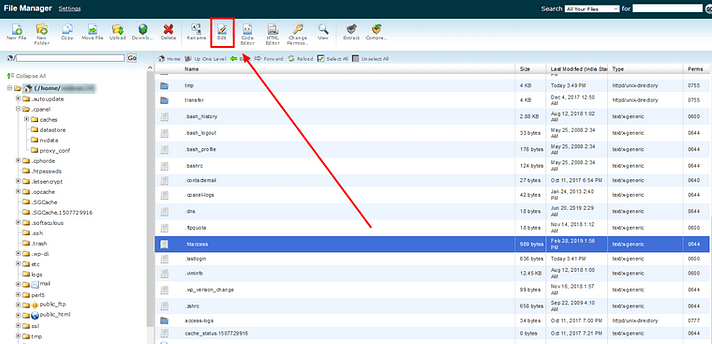
Once you have saved the file to your machine, select the “.htaccess” file and click “Edit”. Alternatively, you can right-click on the file and select the “Edit” option there. To move on to the next step, click “Edit” in the dialogue box that appears.
In the text editor, you’ll want to add one of the following code snippets depending on your needs:
Redirect a single page to another page:
Redirect 301 /old-page.html http://www.example.com/new-page.html
Make sure to replace the example URLs with the URLs of the actual pages you want to redirect.
Redirect entire domain name to another domain name:
This code snippet will send visitors to the same URL slug at a new domain name. E.g. oldsite.com/example-post goes to newsite.com/example-post
RewriteEngine On
RewriteCond %{HTTP_HOST} ^(?:www\.)oldsite\.com$ [NC]
RewriteRule ^ http://newsite.com%{REQUEST_URI} [L,R=301]
Make sure to replace the example domain names with your actual old and new domain names.
After editing the .htaccess file, save it and your redirect should be functioning seamlessly.
Conclusion & best practices
If you are doing a domain to domain redirect, make sure that the new page is similar to the original.
The content should reflect at least 70% of what was on the old page in order to minimize damage to your page’s SEO scoring.