
Sometimes we need to import and save excel data into SQL server database, when we are changing database or migrating a any other platform code into C#, we may need to migrate old database data into new database also, we can do it by importing data from excel into database tables using ASP.NET C#, so in this post, we will explain how easily you can import you excel file data into sql server table using ASP.NET MVC, C# and SqlBulkCopy.
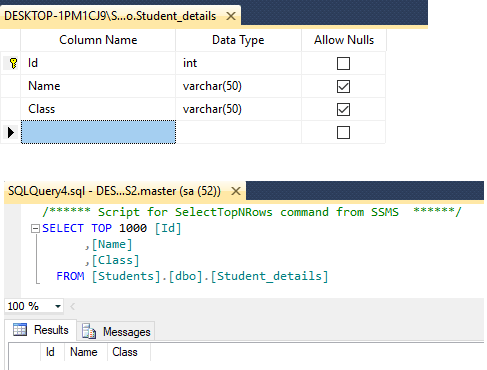
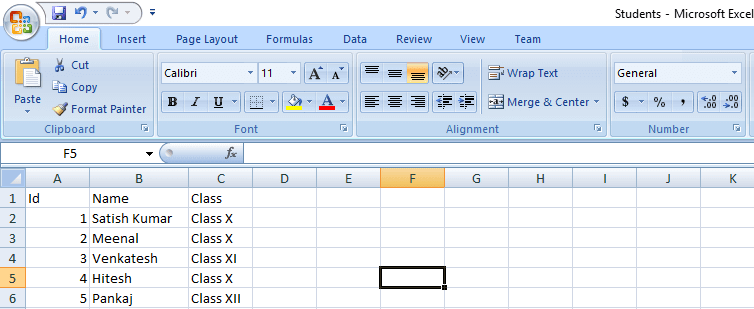
Below is the images of the demo Excel file and data which we need to import in our sql server datatable table and our empty SQL server table with design
Excel file to be imported
Step 1: Let begin by creating a new project of ASP.NET MVC in Visual Studio, Select File->New-> Project -> Select “ASP.NET Web-application” -> Provide a name (“ImportExcelIntoDatabase”) and Click “OK”
Then Select “MVC” to generate basic ASP.NET MVC template with “No Authentication”, Click “OK”
Step 2: Now we will create basic Razor syntax HTML to upload file in MVC, so go to your Index.cshtml (Solution->Views->Home->Index.cshtml) (If there isn’t one, create one view) and use the below code
<br />
    @using (Html.BeginForm("Index", "Home", FormMethod.Post, new { enctype = "multipart/form-data" }))
    {
        <input type="file" name="file" /><br/>
        <input type="submit" value="Import to database" class="btn btn-primary" />
    }
<br/>
<div>
    @ViewBag.Success
</div>
In the above Razor Code, we are creating form to submit file and post it to “HomeController”->”Index” ActionMethod (with HttpPost Verb), here we need to specify addtional HTML attribute, that is, enctype = “multipart/form-data” which is necessary for uploading files.
@ViewBag.Success is used to notify user that file is uploaded and data is imported to sql server database table using C# and sqlBulkCopy
Step 3: Now, we need to create C# code in controller to handle file uploading and then extract data from Excel file using C#
 public class HomeController : Controller
    {
        public ActionResult Index()
        {
            return View();
        }

        [HttpPost]
        public ActionResult Index(HttpPostedFileBase file)
        {
            string filePath = string.Empty;
            if (file != null)
            {
                string path = Server.MapPath("~/Uploads/");
                if (!Directory.Exists(path))
                {
                    Directory.CreateDirectory(path);
                }

                filePath = path + Path.GetFileName(file.FileName);
                string extension = Path.GetExtension(file.FileName);
                file.SaveAs(filePath);

                string conString = string.Empty;

                switch (extension)
                {
                    case ".xls": //Excel 97-03.
                        conString = "Provider=Microsoft.Jet.OLEDB.4.0;Data Source="+filePath+";Extended Properties='Excel 8.0;HDR=YES'";
                        break;
                    case ".xlsx": //Excel 07 and above.
                        conString = "Provider=Microsoft.ACE.OLEDB.12.0;Data Source=" + filePath + ";Extended Properties='Excel 8.0;HDR=YES'";
                        break;
                }

                DataTable dt = new DataTable();
                conString = string.Format(conString, filePath);

                using (OleDbConnection connExcel = new OleDbConnection(conString))
                {
                    using (OleDbCommand cmdExcel = new OleDbCommand())
                    {
                        using (OleDbDataAdapter odaExcel = new OleDbDataAdapter())
                        {
                            cmdExcel.Connection = connExcel;

                            //Get the name of First Sheet.
                            connExcel.Open();
                            DataTable dtExcelSchema;
                            dtExcelSchema = connExcel.GetOleDbSchemaTable(OleDbSchemaGuid.Tables, null);
                            string sheetName = dtExcelSchema.Rows[0]["TABLE_NAME"].ToString();
                            connExcel.Close();

                            //Read Data from First Sheet.
                            connExcel.Open();
                            cmdExcel.CommandText = "SELECT * From [" + sheetName + "]";
                            odaExcel.SelectCommand = cmdExcel;
                            odaExcel.Fill(dt);
                            connExcel.Close();
                        }
                    }
                }

                conString = @"Server=DESKTOP-1PM1CJ9\SQLEXPRESS2;Database=Students;Trusted_Connection=True;";
                using (SqlConnection con = new SqlConnection(conString))
                {
                    using (SqlBulkCopy sqlBulkCopy = new SqlBulkCopy(con))
                    {
                        //Set the database table name.
                        sqlBulkCopy.DestinationTableName = "dbo.Student_details";

                        // Map the Excel columns with that of the database table, this is optional but good if you do
                        //
                        sqlBulkCopy.ColumnMappings.Add("Id", "Id");
                        sqlBulkCopy.ColumnMappings.Add("Name", "Name");
                        sqlBulkCopy.ColumnMappings.Add("Class", "Class");

                        con.Open();
                        sqlBulkCopy.WriteToServer(dt);
                        con.Close();
                    }
                }
            }
            //if the code reach here means everthing goes fine and excel data is imported into database
            ViewBag.Success = "File Imported and excel data saved into database";

            return View();
        }
    }
Here is the quick explanation of the Above Code
File we are uploading the Excel file, the uploaded excel file is saved to a folder named “Uploads” and then based on its extension whether XLS (97-2003) or XLSX (2007 and above), appropriate connection string is read for file, placeholder is replaced by the path of the Excel file.
One we have created OldDbConnection object using connection string, the fetched Sheet name, a SELECT statement is executed and all the records from the Excel sheet are fetched into a DataTable.
Now a connection is established with the database and the SqlBulkCopy object is initialized and I have specified the name of the Table using the DestinationTableName property.
Finally the columns are mapped and all the rows from the DataTable are inserted into the SQL Server table, here the following namespace will be used
using System.Data;
using System.Data.OleDb;
using System.Data.SqlClient;
using System.IO;
using System.Web;
using System.Web.Mvc;
Once you have all the code, build it and run it in browser, here is the demo gif image of the sample.

Further explanation for saving excel column into database without using SqlBulkCopy and filtering it
Now, suppose you don’t want to use SqlBulkCopy, you can also write your own Custom code to match columns of your datatable table and filter it with datatype also.
You would have to loop rows saved in datatable, so instead of using SqlBulkCopy code, which is as below
 using (SqlConnection con = new SqlConnection(conString))
                {
                    using (SqlBulkCopy sqlBulkCopy = new SqlBulkCopy(con))
                    {
                        //Set the database table name.
                        sqlBulkCopy.DestinationTableName = "dbo.Student_details";

                        // Map the Excel columns with that of the database table, this is optional but good if you do
                        //
                        sqlBulkCopy.ColumnMappings.Add("Id", "Id");
                        sqlBulkCopy.ColumnMappings.Add("Name", "Name");
                        sqlBulkCopy.ColumnMappings.Add("Class", "Class");

                        con.Open();
                        sqlBulkCopy.WriteToServer(dt);
                        con.Close();
                    }
                }
we will be saving each row, by looping it usinf foreach, based on conditions, like below
                  foreach (DataRow row in dt.Rows)
                    {

                        bool userStatus;
                        if (row["User Status"].ToString() == "active")
                        {
                            userStatus = true;
                        }
                        else
                        {
                            userStatus = false;
                        }

                        var usernew = new ApplicationUser { UserName = row["Email"].ToString(), Email = row["Email"].ToString(), Name = row["Name"].ToString(), UserStatus = userStatus, PhoneNumber= row["Phone Number"].ToString() };

                        var result = UserManager.Create(usernew, "Test@123");
                        if (result.Succeeded)
                        {
                            if (row["User Roles"].ToString() == "Super Admin")
                            {
                                UserManager.AddToRole(usernew.Id, "Super Admin");
                            }
                            else if (row["User Roles"].ToString() == "Operations")
                            {
                                UserManager.AddToRole(usernew.Id, "Operations");
                            }
                            else if (row["User Roles"].ToString() == "Sales")
                            {
                                UserManager.AddToRole(usernew.Id, "Sales");
                            }
                            else if (row["User Roles"].ToString() == "Sales Agent")
                            {
                                UserManager.AddToRole(usernew.Id, "Sales Agent");
                            }
                            else if (row["User Roles"].ToString() == "Warehouse")
                            {
                                UserManager.AddToRole(usernew.Id, "Warehouse");
                            }

                        }


                    }
In the Above code, as you can see we are going row by row using foreach loop and creating users (active or not), plus creating user roles based one Excel column value “User Roles”.
Note: In the Above C# code, ApplicationUser is ASP.NET MVC Identity method to create a new user.