

A WordPress-powered website can introduce your company to the whole world within minutes, but it’s highly unlikely to happen in case you don’t carry out a proper SEO strategy. As the matter of fact, poor optimization will result in losing subscribers and customers.
For someone who is passionate about developing websites or blogging, nothing seems to be more satisfying than creating a website and watching it grow with time. With the success of one blog, they might want to create another.
In the beginning, everything seems fine. But eventually, you realize that managing both of them together, is not as easy as you thought it would be. At this point, you do not even want to discontinue one of them, because you have spent time, effort and money to run it so far. The only solution now seems to be to merge both the blogs together.
This is just one reason why people would want to merge one of their sites with another. There might be various other reasons too.
It might be because you have launched a new blog where you want your old site’s content to be combined with the new ones. Some may want to merge one of their less successful blogs with a more successful one that has been doing an impressive job.
Besides, managing multiple sites comes with its own problems. First, you have to devote separate time to each of them. Second, your workload increases. Third, you have to spend more time and effort on marketing them individually besides many other additional tasks.
Whatever might be the reason, merging your site into one can solve many of your problems. But in doing so, you definitely do not want to lose the SEO rankings that you have achieved after so much hard work and patience.
In today’s post, let us look at how you can merge two WordPress websites into a single one while retaining your SEO.
Things to Do Before Starting the Merging Process
- Before you start merging your websites, I would recommend you to take a backup of your data to make sure you don’t lose your content in case you go wrong while following the process. You can either do that manually or install a plugin that will help you get the job done. In my opinion, using a plugin is a better and safer option. I personally like the BackupBuddy Plugin for the purpose. You might, however, have other options in mind.
- The second thing to take care of is to set up the same permalink structure on both your sites. If not then you might have to lose the SEO rankings for the content you are about to move.
- Thirdly, in order to have all your data safely imported to the new site you will have to convert all your < / iframe >, < / embed >, or < / script > code to use a shortcode. You can surely use an alternative if that feels easier.
- Fourth, go ahead and edit all the shortcodes on your old site that will not be available on your new site. This might be for a plugin, a theme or anything else. You also need to get all your tags and categories cleaned up. They won’t be different on your new site. These will be imported just like they are on your old site.
- Lastly, get your media gallery cleaned. For that, go to your Library and see if you want to delete any of your images. You can find the ‘missing images’ on your database (not your server) and once they are located you can delete them via your wp-admin.
Now that the preliminary steps are taken care of, we are ready to follow our merging process. Let’s follow them in a step-by-step manner.
Step 1: Exporting Content from the Old Site
It’s now time to export the contents from your old site to the new one. If you have been using WordPress for a while now, you would know about its built-in-feature that allows you to export the entire site’s content like pages, posts and everything else from one site to another.
However, this feature doesn’t work with images. We will look at the images part separately.
To export your contents, you will first have to go to the dashboard of your old site. On your dashboard go to Tools > Export. You will see the following page appear on your screen.
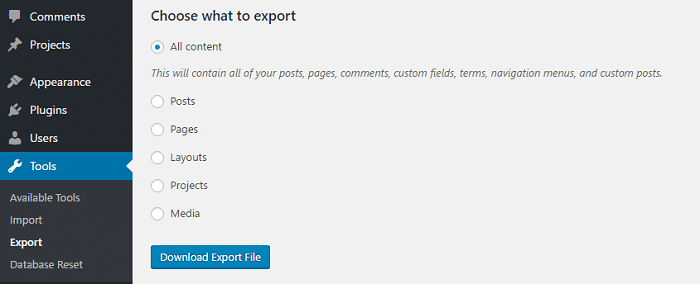
Now select the All Content option and then click on the ‘Download Export File‘ button.
This will let you have an XML file downloaded which will have a stripped down version of all your content. This file will have everything as it was earlier including the structure of your content.
Step 2: Importing Content to the New Site
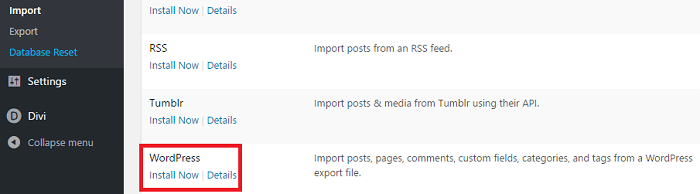
Just like WordPress offers the export feature, it also has an import feature by default. To use this option, just go to your new site’s dashboard and select Tool > Import Tab. Towards the end of this page, you will find an option called WordPress.
Below that, you will see the Install Now option. Click on it.
Wait for the installation to be completed. Once done you will see that the Install Now option has been changed to the Run Importer option. Click on this option. You will now be directed the following window.
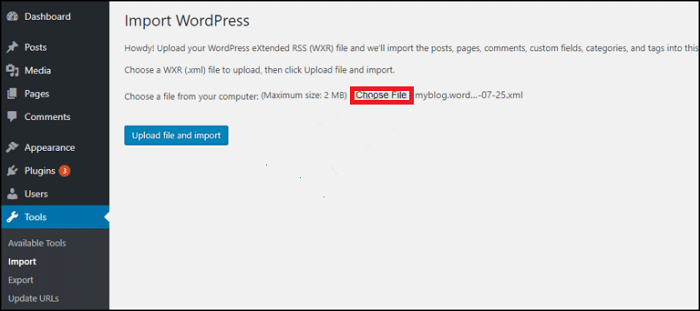
On this page click on the Choose File button and select the XML file that was exported from the old site. Now click on the Upload File and Import button for the process to start.
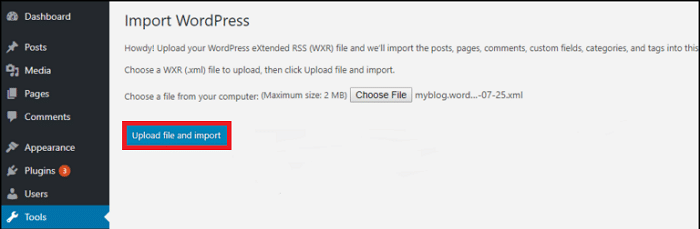
The merging process will now start and will take some time depending on how much content is to be exported. When it is done go ahead and follow our third step which is to assign user role for your content.
Step 3: Assigning Users for Old Content
Once your importing process is done, WordPress will ask you if you want to keep your original authors or assign new authors to the content that just got imported.
You can select whichever option you feel is necessary for your site. You will have to give a new username in the space provided, in case you want to pick a new author for your content. If you want to keep the original authors, you can leave your options blank.
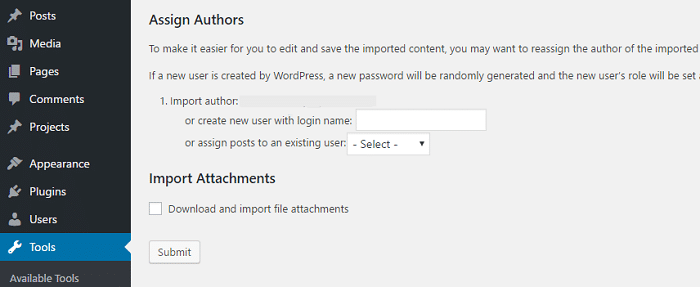
Lastly, check the Download and Import File Attachment box and click on the submit button.
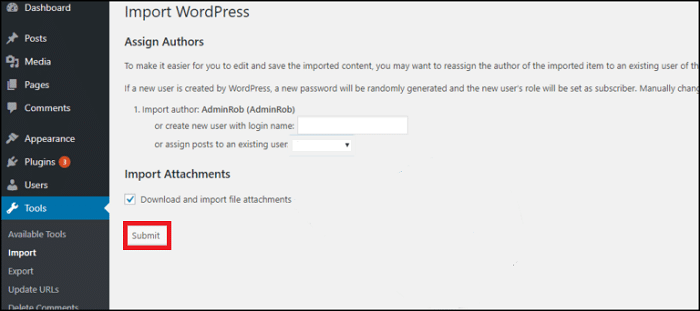
When WordPress is done with all the tasks, it will take you to the next page and display the following message.
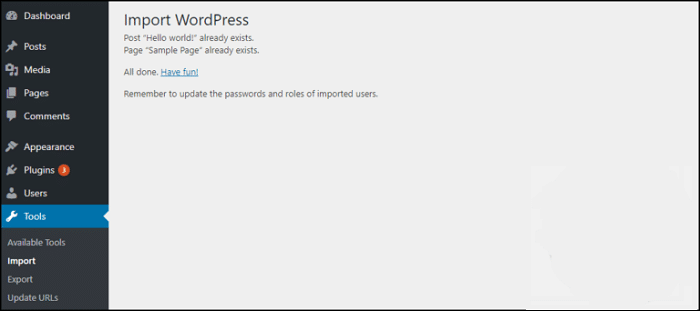
This means that your merging process was successfully completed.
Step 4: Setting Up URL Redirects by Retaining Your SEO Rankings
Now that your content has been merged, its time you take care of your URLs. If not you might end up losing all your potential clients. To do that you will have to redirect your old URLs to your new site.
WordPress offers tons of amazing plugins to help you redirect your URLs. One such plugin is the Simple 301 Redirect Plugin. You can also do it by altering your .htaccess file.
In this post, we will follow the second method. The .htaccess file is used for various things. From redirecting your URLs to compressing the HTML and .txt file this file helps you with a lot of features.
In order to access this file, you will first have to go to the root directory of your old blog. This can be done by using any FTP client such as FileZilla. Here you will see your .htaccess file. Right Click and select the Edit option here. You then need to add the following code:
#Options +FollowSymLinks
RewriteEngine on
RewriteRule ^(.*)$ http://www.yournewsite.com/$1 [R=301,L]
The URL here should be that of your New Site. Also, consider using HTTP or HTTPS depending on what is used on your site. Once you are done, do not forget to save the file. Your site is now ready to redirect all your users to the new site, every time they try to access the old site.
This will help you retain the SEO rankings that you have gained over the period of hard work and patience.
Step 5: Updating Links of Internal Posts
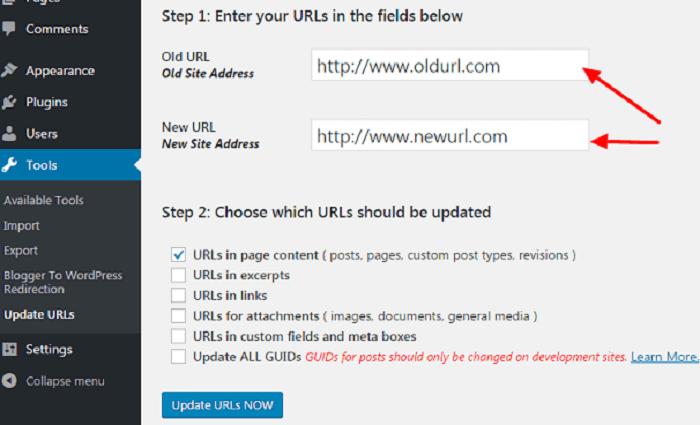
Although you have successfully redirected all your URLs, there are still some tasks left for you. You also have to update all your URLs. Plugins like Velvet Blues Update URLs can help you make things easier.
To use this plugin, you just have to install it and then provide your old and new URLs. Below you will see an option that asks you to select which URLs to be updated. Check the boxes depending on your requirement and click on the Update URLs Now button.
Step 6: Importing Your Images
This step is slightly trickier than the previous ones. It is easier to import contents than importing images from one site to another. Some of your images might not be properly imported. So it is a good idea that you upload your images manually into the media library of your new website.
To upload the images, you first need to download them from the old site and then upload them again on the new site in the same directory.
Congratulations! With the completion of the task, your merging process comes to an end.
It’s easy. Isn’t it? In case your images are not properly uploaded, just repeat the sixth step all over again. Your work should be done.
Having Trouble Merging Your Sites?
This post covers all the step required to successfully merge two WordPress websites. You should generally not have any problem merging your sites if you follow this guide. The only problem might be a little mess in the new site owing to the number of categories and tags that existed on your old blog. This might result in having duplicate content on your new site. This can be taken care of by removing the duplicate content manually.
However, if the error is a severe one, and you fail to recognize what’s causing it, the best option is to restore your old site using the backup that you have created at the beginning of the process.
Over to You
For all those who are doing it for the first time, merging two sites sounds like a tricky thing to do. But if the steps mentioned here are followed correctly, you can do it in a matter of just a few hours. If you need to move your WordPress hosting to more reliable hosting provider, I recommend ASPHostPortal for you. I hope this post was helpful to you. Do let us know if you could do it correctly. We would love to hear from you.